Author's Tools for XnView
- This is an Author's tool which is not built in the programme, added since the 1.90.3 version.
- It's made up to two files which must be located in the directory of XnView as following :
-
\AddOn\Paint.xnp - General executable library,
-
\AddOn\Paint.lng - Text
 language-file (a single file for all the languages, there is only a few strings to translate
)
language-file (a single file for all the languages, there is only a few strings to translate
)
- The tool allows you to make retouchs on various images : photos, screen shots etc.
- One gets the tool from the Filter Menu
 Paint When an image is displayed only !
- Below, the main window of the tool :

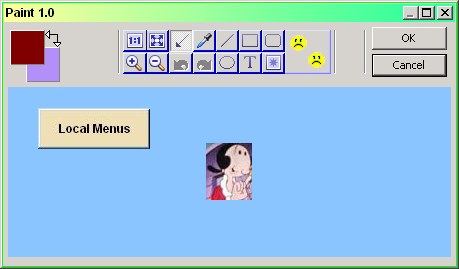
- Please, click the active buttons with
 to get the topics, and read the info-texts hovering the other buttons¦items.
-
Chapter Menu


Tools buttons.
- Move
- Allows to move the image in the window when it's either originally larger, or blown up.
One gets the Grab-hand cursor clicking with the left-mouse-button and keeping it pressed.
- If the right button is already configured for Grab-hand, that works too
- Main window
- Pick¦Read the value of a colour
- One gets the Pipette cursor
 from this button. The colour information and the coordinates of every pixel hovered by the cursor are displayed close to the tool-buttons area at the top of the window.
This is the same function than Display Colour information in View mode.
- With a left-click, one picks the colour of the pixel as the foreground colour (line, text
)
- With a right-click, one picks the colour of the pixel as the background colour.
- Each picked out colour is shown in a sample-rectangle at the left¦top of the window, like one can see on the capture.
- With a double-click on a sample-rectangle, one gets the colours palette.
- Main window
- Draw lines
- The button displays the options to draw three kinds of lines :
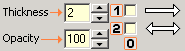

- Each ticked box produces the line having the corresponding number on the right-side image (see the info-texts
)
- It's impossible to tick the two boxes, they behave as <EXCLUSIVE OR> like radio-buttons.
- The outline of an arrow point has the current foreground colour.
- The filling has the current background colour.
- The arrow lines can be handy, i.e. to show a detail¦defect on a screen shot¦photo
- An odd thickness value produces more aesthetic arrows
- Main window
- Draw rectangles
- One displays the options to draw rectangles from these two buttons.
- They are the same for the two types, except that one gets an extra choice for the rounded rectangle as a percentage.
- Rounded 100% = ellipse !

- Simple rectangle¦Empty frame has the foreground colour.
- Full rectangle, no border has the background colour. Whether this is inconvenient,
one can change the colours temporarily from the palette
- Full rectangle with border the filling has the background colour, the border has the foreground colour.
- By default, the rounded value is 1 (%).
- Set any other value at the first use to start the values storage
- Main window
- Draw an ellipse¦a circle
- The displayed options are the same than for the normal rectangle. Please, see above.
- Main window
- Append some text onto the image
- Cliking the button, one gets the general text parameters prior :
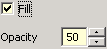
- When one ticks the Fill box, the empty parts of the text area will be filled with the current background colour.
- One may adjust the opacity, it stands for the filling colour too.
- Then, do a single left-click where you wish to place the text, that calls the dialogue-box
in which one can configure and type the text to append :

- Choose the font to use, its size, font-weight, style
and type the text on the left-side box.
- X:
- Shift of the shade with regard to the horizontal lines of the characters (pixels).
- Y :
- Shift of the shade with regard to the vertical lines of the characters (pixels).
- Press OK.
- The text lands on the main window where you clicked prior. Clicking (keep pressed) into the red frame which contains it,
one gets a cursor allowing to move and place the text where it must be set :


- At the right-side, the text when it's placed, and one has chosen either another tool, or to quit Paint with the OK button.
- The point where you clicked prior to define the text location might be marked with a small icon
We have proposed it, and the Author seems to be in favour
For a next version.
- Main window
 Append an image as a watermark
- Pressing this button, one gets Opacity, the only parameter to adjust :

- Click anywhere on the window, the dialogue-box Choose the file to use as a watermark is displayed.
- Let's notice that from this function, the Preview part of this dialogue is not available
- Mark the wanted file with a single click, and use the Open button.
- The chosen image lands on the image to retouch, it has the configured opacity.
- It's contained in a frame, so handle it like the text above whether the watermark image is smaller than the current image to process.
- One can add two images successsively as watermarks, please see the Menus further to manage this case
- Currently, it isn't possible to add a tiled small watermark image as one go on the whole area of the current image.
- Main window
- OK Button
- Let's notice that the changed image is not automatically saved on the hard-disk when one closes the Paint tool.
- The button makes a temporary storage of the changes that one made only.
- One must save definitely the changed image as usual from the View window of XnView.
- Main window
- Cancel Button
- Closes the main window of the tool, doesn't store any change to save.
- Main window
- Local Menus
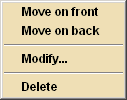
- Right-clicking inside the area of an added retouch-object, one can get a local menu.
- With Lines, Ellipse, Rectangles, Watermark, this one :

- Move on front
- When there are two (or more) retouch-objects added on the image, makes that the object on which one gets the menu
comes on top, above the other¦s.
- Move on back
- The opposite action than above : the object is placed under the other¦s.
- Delete
- Removes the retouch-object from which one gets the menu.
- With a Text object, the menu below is shown :
- Modify
- Reopen the dialogue-box to modify the text or the font, style etc.
- This is the only supplemental menu item regarding the other menu above
- Main window
- Missing tools and options
- Unfortunately, the most basic usual retouch tools are not implemented (yet ?)
- Please, see also the Missing Options and where discuss about this.
- Below, we show the tools whose we guess they are necessary¦indispensable, also according to every user's needs :

Please, click on the icons
- The pen¦cil est obviously the most basic retouch tool
For instance, simply to remove an inopportune cursor on a screen shot, or to add¦change some pixels only
- Paragraph Start
- Like noticed already, each retouch can't be stored whether one doesn't close the main window
This button should allow to do so, it should ease the using a lot. We guess that it might be designed as a part of the default set
- Paragraph Start
- The classic selection (rectangular) could create an objet on the current image, thus one could get the local menu to remove a chosen area using the Delete entry when the background colour is convenient. Preferably, as a button of the default set
- Paragraph Start
- Maybe less used, but missing in the main programme, the special Lasso selection which allows to choose an area of any shape could fill in this lacuna. As an option.
- Paragraph Start
- Although it's a very usual retouch tool, the paint tin to fill large areas could be displayed from an option only,
please see the global proposal further.
- Paragraph Start
- The rubber is also a classic drawing tool. However, all users don't need it necessarily, thus it could be optional.
- Paragraph Start
- Missing Options
- The background colour of the add-on on the start image here is not real, we have cheated
The real one is quite black and it's absolutely impossible to change it currently.
This causes an issue when some text you prepared lands on, it's very difficult to spot and recover it
- Paragraph Start
- From the Blow up and Reduce buttons, the zoom-step is too large in our opinion. Alas, the add-on is unable to use the zoom-step configured in the main programme, so this option sounds as very useful.
- Paragraph Start
- When using Watermark, it should be useful to retrieve the last used image path
- Paragraph Start
- Still for Watermark, and like noticed above, one can't get a full tiled watermarked background from a single small image as one go.
Hence, an option should be welcome
- Paragraph Start
- Main Window
- Global Proposal and discussion
- The global proposal in order to improve that add-on can be read and discussed in the English Forum of XnView.
- Paragraph Start
Chapter Menu


